
A backyard vegetable patch is wonderful until a week of hard rain compacts the soil, slugs chew the lettuce, and a surprise heat wave makes your spinach bolt. I still grow plenty in beds, but I love having a small hydroponic setup indoors where I can pick crisp greens even when my Zone 6 garden sits frozen outside.
Growing without soil sounds fancy at first, but a simple countertop system is very manageable. Once you understand light, water, nutrients, and airflow, you can grow lettuce, basil, and other quick vegetables in a spare corner of your home.
Why Grow Hydroponic Vegetables at Home?
Hydroponics means growing plants with their roots in nutrient-rich water instead of garden soil. The roots receive water, dissolved minerals, and oxygen directly, which often leads to fast, clean growth in a small space.
I like hydroponics most during late winter. By February, I am tired of buying limp grocery-store herbs, and my outdoor beds are still frozen. A small 2-foot-wide shelf setup can provide enough leaf lettuce, arugula, and basil for regular meals without waiting for spring.
Hydroponics also works well for apartment gardeners, renters, and anyone with a shaded yard. If your patio does not receive enough sunlight, indoor growing gives you control. You may still enjoy a small-space edible garden outdoors, but hydroponics keeps food production going year-round.
The biggest difference is consistency. Outdoor vegetables deal with rain, drought, poor garden soil, rabbits, and temperature swings. Indoors, you control the water level, nutrient strength, temperature, and light schedule.
Pro Tip: I always start beginners with lettuce or basil. They grow quickly, forgive minor mistakes, and give you a harvest before you lose interest in checking water levels.
Choose the Right Hydroponic Vegetables
Not every vegetable suits a first hydroponic garden. Start with compact crops that grow quickly and do not need heavy support, hand pollination, or a large root zone.
Best Crops for Beginners
Leaf lettuce is my favorite starting crop. Loose-leaf varieties such as Black Seeded Simpson, oakleaf, and red leaf lettuce usually grow well in shallow systems. Harvest outer leaves at about 4 to 5 inches tall, and the plants keep producing.
Basil also performs beautifully in hydroponics. It likes warmth, steady moisture, and bright light. Pinch the top set of leaves once the plant reaches about 6 inches tall to encourage branching. If your plant starts looking unhealthy, these guides on basil leaves turning brown and why a basil plant is dying can help you catch problems early.
Other easy choices include:
- Arugula, which grows fast and adds a peppery flavor to salads
- Bok choy, especially baby varieties that mature in about 30 to 40 days
- Swiss chard, which offers repeated harvests from a few plants
- Kale, which handles cooler rooms and produces baby leaves quickly
- Cilantro, which grows best when you keep the root zone cool
- Parsley, which takes longer to sprout but produces for months
- Green onions, which need little space and regrow after cutting
Crops to Save for Later
Wait on fruiting vegetables such as tomatoes, peppers, cucumbers, and eggplants until you learn the basics. They need stronger lights, larger reservoirs, more nutrients, plant support, and often hand pollination.
You can grow them hydroponically, but they are not simple beginner crops. For comparison, even outdoor tomatoes need careful spacing and support, as explained in this guide to growing tomatoes in a square-foot garden.
Pro Tip: I avoid starting with a mixed seed packet. One tray of lettuce and one or two basil plants makes it much easier to notice what each crop needs.
Pick a Home Hydroponic System
You do not need a large, complicated setup to grow hydroponic vegetables at home. A simple deep water culture, often called DWC, is the best place to begin.
In a DWC system, plants sit in net cups above a covered container of nutrient solution. Their roots grow down into the water. An air pump and air stone bubble oxygen through the reservoir, preventing roots from suffocating.
Start With Deep Water Culture
For a small lettuce garden, use an opaque storage tote that holds 5 to 10 gallons. Dark plastic blocks light, which helps prevent algae. Choose a lid sturdy enough to support plants, then cut holes for 2-inch net cups about 6 to 8 inches apart.
Place the tote in a room where you can maintain temperatures between 65 and 75 degrees F. Lettuce grows best toward the cooler end of that range. Basil prefers 70 to 80 degrees F.
A basic system needs:
- An opaque container with a lid
- Net cups, which are slotted baskets that hold plants
- An air pump, tubing, and air stone
- A growing medium, such as clay pebbles or coco coir plugs
- Hydroponic nutrients made for edible plants
- A pH test kit or digital pH meter
- A timer for the grow light
- A full-spectrum LED grow light
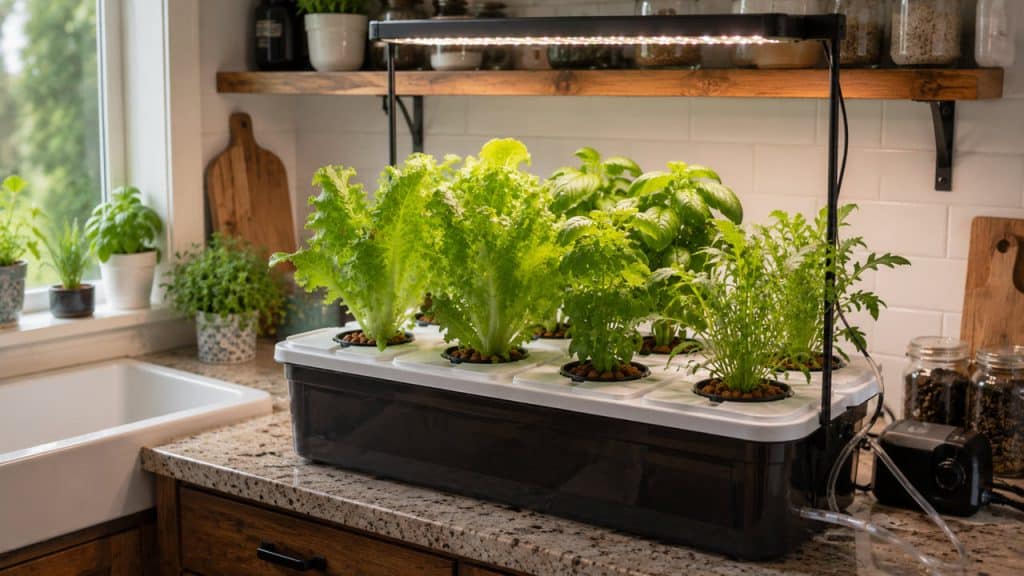
For more small-area growing ideas, browse these vertical garden ideas. A compact shelf can hold a hydroponic reservoir on the bottom and lights above the plants.
Consider a Simple Kratky Jar
A Kratky system is even simpler. It uses a container of nutrient solution without an air pump. As the water level drops, the roots create an air gap and take in oxygen.
This method works well for one or two lettuce plants in wide-mouth jars or small food-safe containers. It is inexpensive and quiet, but you must avoid topping off the container too often. The air gap matters.
I use Kratky jars for herbs on a bright kitchen shelf, but I prefer a bubbler system for larger harvests. The air pump gives you more room for error when temperatures rise.
Pro Tip: I learned the hard way that clear containers invite algae. Wrap any clear jar with foil or place it inside a dark outer container before adding nutrient water.
Set Up Hydroponic Vegetables at Home
A successful setup does not need perfection. It needs clean water, enough light, steady nutrients, and an easy routine you will actually follow.
Find the Best Indoor Spot
Choose a spot close to an outlet and sink. A laundry room, basement shelf, heated garage, kitchen corner, or spare bedroom works well. Avoid locations where the temperature drops below 55 degrees F at night.
A sunny south-facing window can help, but most vegetables need more light than a window provides during winter. In Zones 4 through 7, daylight is too weak and short from November through February for dependable indoor vegetable production.
Keep the system on a waterproof tray or mat. Spills happen, especially when you lift a lid full of roots.
Install a Grow Light
A full-spectrum LED grow light produces the wavelengths plants use for photosynthesis. Hang it 12 to 18 inches above seedlings, then adjust it as plants grow. Keep it closer, around 8 to 12 inches, for established lettuce if the light is not very powerful.
Run lights for 14 to 16 hours daily for leafy vegetables. Give plants at least 8 hours of darkness because they use that rest period for normal growth processes.
Watch the leaves. Pale, stretched seedlings tell you the light sits too far away or runs too few hours. Bleached spots and curled leaf edges can mean the light hangs too close. If you are comparing indoor setups, this guide to the best grow lights for indoor plants offers useful placement ideas.
Mix Water and Nutrients
Use clean tap water if it is not heavily softened. Water from a household water softener contains sodium, which plants do not need. If your tap water has a strong chlorine smell, let it sit in an open bucket overnight before mixing nutrients.
Use a complete hydroponic nutrient formula designed for vegetables. Unlike regular soil fertilizer, it includes the major and trace minerals plants need in water. Follow the label’s seedling rate first; strong nutrient solution can burn young roots.
For lettuce and herbs, aim for a mild nutrient strength. Many growers use an EC meter, which measures electrical conductivity, to track dissolved nutrients. Beginners can start without one, but consistency improves when you add one later.
Adjust the pH
pH measures how acidic or alkaline the nutrient solution is. Most hydroponic vegetables absorb nutrients best when the pH stays between 5.5 and 6.5. I aim for about 5.8 to 6.2 for lettuce and basil.
Test the pH after mixing nutrients. Use small amounts of pH adjuster, wait a few minutes, and test again. Never make a large correction all at once.
Pro Tip: I mix nutrients first and test pH second. If you adjust the water before adding nutrients, you usually have to do the work twice.
Check out Grow a Hydroponic Pot Garden at Home
Start Seeds and Transplant Them
You can begin with seeds or young plants, but seeds give you the cleanest start. Soil from nursery pots can carry fungus gnats and soil-borne problems into your indoor setup.
Germinate Seeds in Plugs
Start seeds in rockwool cubes, coconut coir plugs, or seed-starting sponges. These materials support the seedling while allowing roots to reach water and air.
Moisten the plugs with plain water adjusted near pH 6.0. Sow one or two lettuce seeds per plug, cover lightly, and keep them warm. Lettuce germinates best around 65 to 75 degrees F and often sprouts within 3 to 7 days.
Once seedlings show their first true leaves, move them under the grow light. True leaves are the leaves that appear after the first smooth seed leaves. They resemble the mature plant’s leaves.
Thin each plug to one strong seedling. Snip extras at the surface instead of pulling them out. Pulling can disturb the roots of the seedling you want to keep.
Move Seedlings Into Net Cups
When roots poke through the bottom of the plug, set the plug inside a net cup. Surround it with rinsed clay pebbles if needed for support. The bottom of the plug should barely touch the nutrient solution at first.
As roots lengthen, they will grow down into the reservoir. Keep the water high enough to reach young roots for the first week. After that, let a small air space develop below the net cup.
For seed-starting guidance that also applies to outdoor beds, see vegetable garden seeds vs. plants. The main hydroponic difference is that you skip garden soil entirely.
Pro Tip: I label every plug at planting time. Lettuce varieties look nearly identical as seedlings, and unlabeled greens become a guessing game fast.
Maintain Your Hydroponic Vegetable Garden
Hydroponics rewards small, regular checks. I spend about 10 minutes twice a week on a small system, which is less time than I spend watering containers outside in July.
Check Water Levels Twice Weekly
Plants drink more as they grow. Young lettuce may barely lower the reservoir, but full plants can use several cups daily under bright lights.
Top off the reservoir with plain water between full nutrient changes. Add nutrients only when you replace the solution, unless your measurements show a clear need. Repeatedly adding concentrated nutrients can make the water too strong.
Keep an eye on roots. Healthy roots look white or cream-colored and smell fresh. Brown, slimy roots with a sour smell point to low oxygen, warm water, or microbial growth.
Replace the Nutrient Solution
Change the nutrient solution every 10 to 14 days for small home systems. Empty the reservoir, rinse it with warm water, wipe away residue, and refill with fresh nutrient solution.
Do not use garden soil, compost tea, or homemade organic fertilizer in a water reservoir. They can clog equipment, create odor, and feed unwanted microbes. Save compost and soil amendments for your outdoor beds, where they belong. If you are improving an outside plot too, this guide on preparing soil for a vegetable garden will help.
Manage Temperature and Airflow
Keep nutrient water between 65 and 72 degrees F when possible. Warm water holds less oxygen, and roots struggle when the reservoir stays above 75 degrees F.
A small fan set on low improves airflow around leaves. Good air movement strengthens stems and reduces the damp, stagnant conditions that encourage mildew. Keep the fan indirect; you want leaves to flutter, not bend hard.
Hydroponic plants have fewer pest issues than outdoor plants, but pests can still hitchhike indoors. Check leaf undersides weekly for aphids, spider mites, or tiny whiteflies. If you spot pests, isolate the plant and use the steps in this guide to get rid of aphids on indoor plants.
Pro Tip: I keep a notebook beside my shelf garden. Writing down water changes, pH readings, and harvest dates makes it much easier to solve problems before they grow.
Harvest Hydroponic Vegetables Often
The best part of a hydroponic garden is harvesting a little at a time. With loose-leaf lettuce, start picking outer leaves when they reach 4 to 6 inches long. Leave the center growing point untouched, and you can harvest again several times.
Cut basil just above a pair of leaves. That cut encourages two new side shoots, making the plant bushier. Never strip more than one-third of a plant at one time.
Baby bok choy and arugula often reach harvest size within 25 to 35 days under good light. Full heads of lettuce usually take 35 to 50 days, depending on variety and temperature.
When lettuce begins stretching upward and tasting bitter, it is bolting. Replace it with a new seedling. A steady supply comes from starting a few new seeds every two weeks.
Things to Keep in Mind
- Keep light off the water: Use opaque reservoirs and cover unused holes to prevent algae, which competes for nutrients and makes cleaning harder.
- Watch room temperature: Keep leafy crops near 65 to 75 degrees F; hot rooms can cause bitter lettuce, weak roots, and fast water loss.
- Do not overfeed seedlings: Start with a mild nutrient mix because tiny roots burn more easily than established plants.
- Use food-safe containers: Choose clean containers that once held food or are clearly labeled food-safe; avoid old buckets with unknown chemical history.
- Clean between crops: Wash reservoirs, net cups, tubing, and air stones after each crop cycle to prevent root disease from carrying forward.
- Expect seasonal adjustments: Indoor plants need longer lighting hours in winter, while warm summer rooms may require cooler water and better airflow.
Frequently Asked Questions
Can I grow hydroponic vegetables without a grow light?
You can grow some herbs near a very bright south-facing window, especially in late spring and summer. For dependable lettuce, basil, and greens year-round, use a grow light for 14 to 16 hours daily. Window light changes too much with weather and season.
What are the easiest hydroponic vegetables for beginners?
Leaf lettuce, basil, arugula, bok choy, and green onions are excellent first crops. They grow quickly, stay compact, and do not need pollination. Start with one or two varieties instead of filling a system with many crops.
How often should I change hydroponic water?
Change the nutrient solution every 10 to 14 days in a small home system. Top off with plain water when the level drops between changes. Replace it sooner if it smells bad, turns cloudy, or develops algae.
Can I use regular plant fertilizer for hydroponics?
No. Regular fertilizer often lacks the micronutrients that vegetables need when they have no soil. Use a complete hydroponic nutrient formula labeled for edible plants, and mix it at the recommended strength.
Do hydroponic vegetables taste different from soil-grown vegetables?
Well-grown hydroponic vegetables taste fresh and flavorful. Taste depends more on plant variety, light, harvest timing, and nutrition than on whether the roots grow in soil. Lettuce harvested minutes before dinner usually tastes better than greens that traveled for days.
Is hydroponic gardening cheaper than buying vegetables?
A small setup costs more at the beginning because you need lights, nutrients, and containers. Over time, it can save money on herbs and salad greens, especially during winter. I value it most for the freshness and steady harvest, not just the grocery bill.
Growing hydroponic vegetables at home comes down to choosing easy crops, giving them steady light, mixing fresh nutrients, and checking the water regularly. Start small with lettuce or basil, keep your setup clean, and add more plants after your first successful harvest. I hope you found this article helpful.
You May Also Like
- How to start a thriving balcony herb garden
- How to grow vegetables on a balcony
- How to start a vegetable garden in your backyard
- Vegetables for container gardens
- How to grow lemongrass indoors

Hello there! I’m Elsa, and gardening is my passion. As an avid gardener, I created GardeningElsa.com to share my knowledge and experience with fellow enthusiasts. My website is a comprehensive resource for gardeners of all levels, offering expert advice on a wide range of topics, including plants, flowers, herbs, and vegetable gardening. Whether you’re a beginner looking to start your first garden or a seasoned pro seeking to expand your knowledge, GardeningElsa.com has something for everyone. Read more about me.