
A backyard vegetable bed teaches you patience. You wait for rain, pull weeds, and hope the soil stays loose enough for roots to spread. But when I wanted fresh basil, lettuce, and herbs during a cold Zone 5 winter, I started growing them indoors with water instead of garden soil.
Hydroponic gardening sounds high-tech at first, but a beginner setup can stay surprisingly simple. You give plants light, water, nutrients, oxygen, and support, then let the roots do their job. This guide walks you through starting a small, dependable hydroponic garden without making your first project harder than it needs to be.
What Is Hydroponic Gardening?
Hydroponic gardening means growing plants without garden soil. Instead, roots receive water mixed with a balanced hydroponic nutrient solution, which supplies the minerals that soil normally holds.
Plants still need the same basics they need outdoors: light, warmth, air circulation, water, and nutrients. The difference is that you control those conditions more closely. That control makes hydroponics especially useful in apartments, garages, basements, sunny kitchens, and places where a full outdoor plot is not practical.
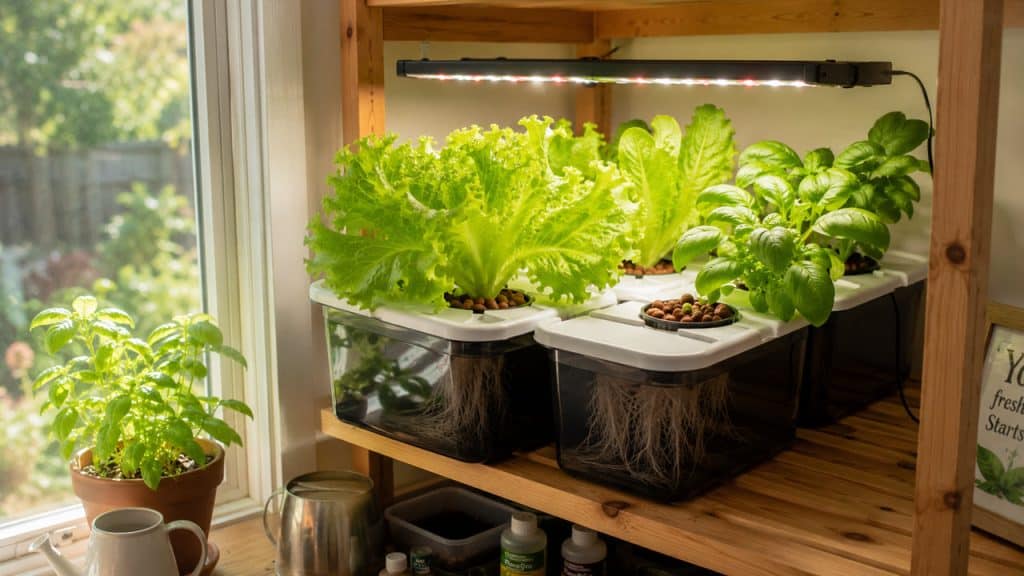
A simple hydroponic setup can fit on a counter, shelf, or utility table. It also works well alongside a small-space edible garden or a productive balcony vegetable garden.
Pro Tip: I always tell first-timers to think of hydroponics as container gardening without potting mix. Start small enough that you can check every plant in two minutes each morning.

Why Start Hydroponic Gardening at Home?
The biggest benefit is consistency. Outdoor gardeners in Zones 4–7 often lose weeks of growing time to spring cold snaps, summer storms, or early fall frost. Indoors, your lettuce does not care whether snow covers the patio.
Hydroponics also uses less space than a traditional vegetable patch. I have grown six heads of loose-leaf lettuce and several herb plants on a shelf only 3 feet wide. Since plants do not compete with weeds, you spend more time harvesting and less time pulling unwanted seedlings.
You can also avoid many soil-related problems. There are no soil gnats from old potting mix, fewer weeds, and less splashback that spreads disease onto leaves. Still, hydroponic plants need clean equipment and regular checks. Neglect turns a small reservoir of water into a fast-moving problem.
If you enjoy growing food in tight spaces, combine this approach with ideas from small-space vegetable gardening. The same careful planning makes every square foot more productive.
Choose Your First Hydroponic System
For beginners, I recommend starting with Kratky hydroponics or a basic deep water culture system. Both methods grow leafy greens and herbs well, and neither requires complicated plumbing.

Kratky Method: The Simplest Start
The Kratky method uses a container filled with nutrient solution. A plant sits in a net cup above the water, and its roots grow downward into the solution. As the water level drops, roots near the top receive air while lower roots keep drinking nutrients.
This method requires no pump or electricity. A dark, food-safe container with a lid works well. I like a 1-gallon container for one basil plant or a small batch of leaf lettuce. Use an opaque container because light hitting the nutrient water encourages algae growth.
Kratky systems suit quick crops. Start with leaf lettuce, arugula, bok choy, cilantro, or basil. Avoid large-fruiting plants such as tomatoes, cucumbers, and peppers for your first try, as they need more water, stronger light, and more frequent feeding.
Pro Tip: I learned quickly that clear jars look pretty for about three days. Cover every light-exposed surface, because algae can take over before your seedlings get established.
Deep Water Culture: A Better Next Step
Deep water culture, often called DWC, keeps plant roots in nutrient water while an air pump bubbles oxygen through the reservoir. The bubbles help prevent roots from sitting in stale water, which matters when temperatures rise.
A basic DWC setup needs a dark 5-gallon bucket with a lid, a net cup, growing medium, nutrient solution, and an air pump with an air stone. The air stone is a porous piece that releases a steady stream of small bubbles.
DWC works very well for lettuce, kale, Swiss chard, and herbs. You can grow one mature plant in a 5-gallon bucket, or use a larger storage tote for several greens. Give each lettuce plant about 6 inches of space so leaves can dry after watering and air can move freely.
Pro Tip: In my experience, a DWC bucket stays easier to manage when I grow one plant per bucket. It may not look as efficient, but it makes topping off water and checking roots much simpler.
Save Advanced Systems for Later
Nutrient film technique, vertical towers, and drip systems can produce impressive harvests. They also need pumps, tubing, timers, and more frequent troubleshooting. A loose hose or failed pump can dry roots quickly, especially in warm weather.
Get one successful crop of greens first. Once you understand light, nutrient strength, and water changes, you can expand into more ambitious indoor growing projects.
Gather Your Hydroponic Gardening Supplies
You do not need a large grow room to start hydroponic gardening. Pick one system and buy only what supports that system.

For a simple Kratky garden, gather:
- An opaque 1- to 2-gallon container with a tight lid
- Net cups, which are small slotted pots that let roots reach the water
- Growing medium such as clay pebbles, coconut coir plugs, or rockwool cubes
- Hydroponic nutrients made for edible plants
- A pH test kit or digital pH meter
- Seeds for leafy greens or herbs
- A drill or sharp tool for making holes in the lid
- A bright window or indoor grow light
For DWC, add an air pump, airline tubing, and an air stone. Keep spare tubing handy because a kinked line can stop airflow without much warning.
Choose a clean location with a nearby outlet and a surface that can handle water drips. A utility shelf in a laundry room works better than a dark corner. If you need better indoor lighting, learn how to choose grow lights for indoor plants before planting.
Pro Tip: I keep a shallow plastic tray under every hydroponic container. Even careful gardeners spill nutrient water while checking levels, and the tray saves cabinets and floors.
Start Hydroponic Gardening Step by Step
Here is the beginner-friendly Kratky setup I would use for a first indoor crop of leaf lettuce. It takes less than an hour to assemble once you have the supplies.

Step 1: Pick Easy Crops
Choose plants that grow quickly and stay compact. My reliable starter choices are Black Seeded Simpson lettuce, butterhead lettuce, arugula, basil, cilantro, parsley, and bok choy.
Leafy crops usually mature in 30 to 45 days from seed. They tolerate indoor conditions better than fruiting crops because they do not need intense light for flowers and fruit. They also give beginners a quick win.
For your first container, grow one crop at a time. Lettuce and basil have different growth habits, and matching their needs makes care easier. If you want a broader plan for edible plants, check out what to plant in your first vegetable garden.
Pro Tip: I start with loose-leaf lettuce rather than head lettuce. You can harvest outer leaves early, so you learn from the plant without waiting for one perfect final head.
Step 2: Start Seeds in a Soilless Medium
Do not drop loose seeds directly into the nutrient reservoir. Instead, start seeds in a damp growing medium that holds the young plant upright while roots develop.
Place one or two lettuce seeds in each moistened starter plug. Keep the plugs warm, around 65 to 75°F, and evenly damp. Most lettuce seeds sprout within 3 to 10 days. Basil prefers a warmer range of 70 to 80°F.
Once seedlings develop their first true leaves, they are ready for the system. True leaves are the second set of leaves that appear after the small first seed leaves. They look more like the mature plant’s foliage.
Thin each plug to the strongest seedling. Snip the extra seedling at the surface rather than pulling it, since pulling can disturb delicate roots.
Pro Tip: I label every plug at planting time. Lettuce seedlings all look similar early on, and guessing varieties later is a lesson I only needed once.

Step 3: Mix the Nutrient Solution
Hydroponic nutrients replace the minerals plants normally pull from garden soil. Use a formula designed for hydroponics and follow the label measurement for young greens. Do not guess or add extra “for faster growth.”
Fill your container with room-temperature water. Then add nutrients according to the directions, mixing thoroughly between additions. If your nutrient system comes in two parts, add each part separately. Mixing concentrated parts together first can create solids that plants cannot use.
Use a pH test kit to check the solution. Most leafy greens and herbs grow best between pH 5.5 and 6.5, with 5.8 to 6.2 as a comfortable target. The pH scale measures how acidic or alkaline water is. At the wrong pH, nutrients may sit in the water but remain difficult for roots to absorb.
Pro Tip: I mix nutrients in a separate pitcher first, then pour them into the reservoir. It prevents concentrated nutrients from touching young roots in one spot.
Step 4: Assemble the Container
Cut holes in the lid that fit your net cups snugly. For lettuce, space holes at least 6 inches apart. For basil, leave 8 to 10 inches because it becomes wider and bushier.
Place each seedling plug into a net cup. Support it with rinsed clay pebbles if needed, but do not bury the stem. The bottom of the plug should barely touch the nutrient solution at first so young roots can reach moisture.
Keep the container fully covered. The lid blocks light, slows evaporation, and prevents curious pets or children from reaching the nutrient water. Write the date and plant variety on masking tape across the lid.
Pro Tip: I leave a small air gap under each net cup after the roots reach the water. That gap is essential in Kratky gardening because the upper roots need oxygen.

Step 5: Provide Enough Light
Light determines whether hydroponic plants grow lush and compact or pale and stretched. A sunny south-facing window may support herbs in spring and summer, but winter light in northern states often falls short.
For dependable indoor growing, place a grow light 6 to 12 inches above lettuce and herbs. Run it for 12 to 14 hours daily. Use a timer so plants get a regular dark period, just as they would outdoors.
Watch the plant, not just the schedule. Long, leaning stems and wide gaps between leaves mean the light sits too far away or does not run long enough. Bleached patches or crisp leaf edges often mean the light sits too close.
Pro Tip: I raise the light as soon as lettuce reaches toward it. Keeping the fixture at the right distance prevents the flimsy, leggy growth that beginners often mistake for fast growth.
Step 6: Maintain Temperature and Airflow
Most leafy greens prefer temperatures between 60 and 75°F. Lettuce tastes best toward the cooler end of that range. When temperatures stay above 80°F, lettuce may grow bitter or bolt, which means it sends up a flower stalk and stops making tender leaves.
Keep your system away from furnace vents, cold windows, and drafty exterior doors. A small fan on a low setting helps move air and strengthens stems. Aim it across the plants, not directly at them, because strong wind can dry tender leaves.
If you grow in a humid basement, check foliage often. Good airflow reduces fungal issues and makes it harder for pests to settle in. Indoor gardens can still attract aphids and spider mites, so inspect leaf undersides each week. If you spot trouble, use these tips for getting rid of aphids on indoor plants.
Pro Tip: I run a gentle fan for a few hours each day. It keeps lettuce dry and sturdy without making the room feel like a wind tunnel.

Step 7: Check Water, Roots, and Plant Health
Look at your system every day for the first two weeks. Check the water level, leaf color, and root appearance. Healthy roots usually look white or cream-colored and smell clean.
Top off the reservoir with plain water when the level drops. In a Kratky setup, do not refill it all the way to the top once the roots have developed. Preserve a 1- to 2-inch air gap for oxygen. In DWC, you can maintain a higher level because the air stone supplies oxygen.
Replace the nutrient solution every 2 to 3 weeks in a small system. Dump the old solution, rinse the container, and mix a fresh batch. This reset keeps nutrient levels more balanced and prevents salt buildup.
Pro Tip: I trust my nose when checking roots. If the water smells sour or swampy, I change it immediately instead of waiting for the next scheduled cleaning.
Harvest Your First Hydroponic Crop
Harvest loose-leaf lettuce when leaves reach 4 to 6 inches long. Pick the outside leaves first, leaving the center growing point in place. This “cut-and-come-again” method gives you several harvests from one plant.
Harvest basil once stems have at least three sets of leaves. Cut just above a leaf pair to encourage branching. Do not remove more than one-third of the plant at one time.
Rinse harvested greens under cool running water and dry them well. Store leaves in the refrigerator with a paper towel to absorb extra moisture. Fresh hydroponic lettuce usually stays crisp for several days when harvested in the morning and refrigerated promptly.
Pro Tip: I harvest lettuce before lunch, not after dinner. Leaves stay firmer when I pick them before the grow lights have warmed the plants all day.

Things to Keep in Mind
- Keep light out of the reservoir: Use opaque containers and lids because light encourages algae, which compete with roots for oxygen.
- Do not overfeed seedlings: Start young plants with a mild nutrient mix because concentrated nutrients can burn tender roots.
- Protect the air gap: In Kratky systems, leave 1 to 2 inches of space above the water after roots develop.
- Watch room temperatures: Keep leafy greens near 60 to 75°F; prolonged heat above 80°F causes bitter leaves and early bolting.
- Clean between crops: Wash containers, net cups, tubing, and air stones before replanting to reduce algae, disease, and pest problems.
- Keep nutrients secure: Store nutrient concentrates out of reach of children and pets, and wipe up any spills immediately.
Frequently Asked Questions
Is hydroponic gardening good for beginners?
Yes, hydroponic gardening works well for beginners when you start with herbs or leafy greens. A simple Kratky container requires little equipment and teaches the key habits of checking light, water, roots, and nutrients.
What is the easiest plant to grow hydroponically?
Loose-leaf lettuce is often the easiest first hydroponic crop. It grows quickly, needs moderate light, and tolerates beginner mistakes better than tomatoes, peppers, or cucumbers.
Do hydroponic plants need sunlight?
Hydroponic plants need light, but they do not need direct outdoor sunlight. A bright window may work seasonally, while a grow light running 12 to 14 hours each day gives more dependable results.
How often should I change hydroponic water?
Change the nutrient solution every two to three weeks in a small home system. Change it sooner if it smells unpleasant, looks cloudy, develops algae, or has many dead roots.
Can I use regular fertilizer for hydroponics?
Use nutrients made specifically for hydroponic growing. Regular garden fertilizer may lack important micronutrients or contain forms of minerals that do not dissolve and circulate well in water.
Can you grow tomatoes hydroponically as a beginner?
You can, but I would not make tomatoes your first crop. They need stronger lights, larger reservoirs, support, pollination, and closer nutrient management than lettuce or herbs.
Starting hydroponic gardening comes down to choosing an easy crop, using a simple system, supplying balanced nutrients, and checking plants often. Begin with loose-leaf lettuce or basil in a small Kratky container, then expand only after you harvest your first healthy crop. I hope you found this article helpful.
You May Also Like
- How to start a thriving balcony herb garden
- Best indoor plants for direct sunlight
- How to start a vegetable garden in your backyard
- How to grow herbs in a square-foot garden
- How to keep plants watered while on vacation

Hello there! I’m Elsa, and gardening is my passion. As an avid gardener, I created GardeningElsa.com to share my knowledge and experience with fellow enthusiasts. My website is a comprehensive resource for gardeners of all levels, offering expert advice on a wide range of topics, including plants, flowers, herbs, and vegetable gardening. Whether you’re a beginner looking to start your first garden or a seasoned pro seeking to expand your knowledge, GardeningElsa.com has something for everyone. Read more about me.
