
A small autoflowering plant can look ready to harvest before you have even decided whether you want seeds. I have had this happen in a sunny backyard bed, where one fast-finishing plant was covered in mature flowers while the rest of the garden still needed weekly feeding and watering.
Saving seed from autoflowers takes a little planning because these plants run on a quick internal clock. Once you understand pollination, seed maturity, and drying, you can collect viable seeds without rushing the process. Here is how to get seeds from autoflowering plants, from choosing parent plants to storing your finished seed crop.
What Are Autoflowering Plants?
Autoflowering plants begin flowering based on age rather than waiting for changes in day length. Many garden plants respond to longer nights or shorter days before they flower, but autoflowers move from vegetative growth into flowering after a set number of weeks.
This quick cycle makes them useful in places with short summers, including colder parts of Zones 4 through 6. It also means you need to plan seed production early. You cannot usually wait until late in the season to decide you want seed, because the plant may already be nearing the end of its life cycle.
For a healthy seed crop, start with strong parent plants. Give them loose, fertile garden soil, steady moisture, and enough sunlight. If you are building a new bed, these tips for how to prepare soil for a vegetable garden will help you create a better root zone before planting.
Pro Tip: I have found that the healthiest plants make the easiest seed-saving project. A stressed plant may still produce seeds, but I do not want to save genetics from a plant that struggled with pests, poor roots, or weak growth.
How to Get Seeds From Autoflowering Plants
To get seeds from autoflowering plants, you need a fertile female flower and pollen from a compatible male flower. Pollination moves pollen to the female flower, allowing the plant to form mature seeds.
For gardeners working with legal autoflowering varieties in their state, the basic process stays the same: choose healthy plants, keep unwanted pollen away, pollinate at the right time, and wait until seeds fully mature.
Start With Healthy Parent Plants
Your seed crop begins long before the flowers open. Choose plants that have sturdy stems, healthy leaf color, good spacing between branches, and no signs of disease. Avoid saving seed from plants that suffered severe mildew, rot, insect damage, or nutrient problems.
I like to grow my chosen parent plants in separate containers or in a dedicated corner of the garden. This gives me better control over watering and makes it easier to spot early pest issues. A 5-gallon container works well for many compact annuals, as long as it has drainage holes and a quality growing mix.
Keep the root area evenly moist but not saturated. Wet soil that stays soggy can suffocate roots and invite disease. You can avoid many watering problems by using the same habits described in this guide to keep plants watered while on vacation, including deep watering and mulch.
Use a balanced fertilizer early in growth, then reduce heavy nitrogen feeding once flowering begins. Nitrogen encourages leafy growth, but seed production needs the plant to focus on flowers and developing seeds.
Identify Male and Female Flowers Early
You need to know which plants produce pollen and which plants will carry the seeds. In many seed-producing plants, male flowers make pollen while female flowers develop seeds after pollination.
Male flowers often appear first. They usually form small pollen-producing structures that open as the plant reaches its flowering stage. Female flowers have the parts that receive pollen and later swell as seeds develop.
Check plants every day once flowering begins. Autoflowering plants can move quickly from early flowers to full bloom, especially in warm weather around 70 to 85 F. Waiting even one week may leave you with an open pollen source that spreads farther than expected.
If you grow more than one variety, label every plant. Use a weatherproof tag tied loosely around the main stem. Write the variety name, planting date, and your reason for choosing it, such as “strongest growth” or “best heat tolerance.”
Pro Tip: In my experience, labels save a lot of frustration later. Once flowers fade and seed heads dry, several varieties can look nearly identical in a crowded garden bed.
Keep Pollen Under Control
Pollen travels easily on air movement, clothing, tools, and insects. If you only want seeds from one selected female plant, isolate it before pollen begins to release.
For small gardens, place the pollen-producing plant several yards away from the female plant. Indoors, keep plants in separate rooms or use a clean enclosure with controlled airflow. Outdoors, distance helps, but it does not guarantee complete separation when wind carries pollen.
You can also use selective pollination. This means you pollinate only one branch or a few flowers, rather than exposing the entire plant. Cover the chosen branch with a breathable paper bag after pollinating it. Keep the bag loose enough for airflow, but secure enough that pollen does not escape.
Avoid using plastic bags. Plastic traps moisture, and trapped humidity can lead to mold on flowers and developing seeds. Paper lets the plant breathe while still containing much of the pollen.
Clean your hands, scissors, and work surface before moving between plants. I also change shirts after handling pollen-producing flowers. It may feel excessive, but pollen clings to fabric and can easily end up where you do not want it.
Collect Pollen at the Right Time
Pollen is ready when the male flowers fully open and release a fine, dusty material. This often happens during dry weather or in a warm indoor growing area.
Place a clean sheet of paper, small dish, or glass container beneath the pollen-producing flowers. Gently tap or shake the flowering branch so pollen drops onto the surface. Work slowly. Strong shaking can scatter pollen into nearby plants.
Use pollen right away for the best results. Fresh pollen usually works more reliably than pollen that sits for days in a warm, humid room. If you need to hold it briefly, keep it dry, sealed, and out of direct light.
Choose a dry morning or afternoon for outdoor pollination. Skip rainy, humid, or very windy days. Moisture makes pollen clump, while wind can send it far beyond your intended plant.
Pro Tip: I prefer to collect pollen in the morning after dew has dried. Wet flowers make a mess, and damp pollen does not move cleanly onto the female flower.
Pollinate Selected Female Flowers
When female flowers show fresh, receptive parts, gently apply pollen with a small, clean paintbrush or cotton swab. Touch the pollen lightly onto the flower without crushing it.
Pollinate a few flowers on the same branch rather than trying to cover every flower on the plant. This gives you a manageable seed harvest and lets the rest of the plant continue growing normally. It also makes it easier to track which branch received pollen.
After applying pollen, loosely cover the branch with a paper bag for 12 to 24 hours. Then remove the bag carefully. Mark that branch with a twist tie, plant label, or colored garden tape.
Keep the plant in good growing conditions after pollination. It still needs full sun, steady watering, and protection from pests. Aphids, spider mites, and caterpillars can damage young flowers and seed heads, so inspect plants at least twice a week. If you notice common chewing insects, use these methods to keep bugs out of the vegetable garden naturally.
Let the Seeds Mature Fully
The biggest mistake gardeners make when learning how to get seeds from autoflowering plants is harvesting too early. Pollinated flowers need time to turn into mature seed-bearing structures.
Depending on the plant and weather, seeds may need four to eight weeks after pollination to mature. Warm, stable temperatures help. In a typical Zone 7 backyard garden, I often let the plant finish naturally through late summer, then harvest only when the seed structures look dry and mature.
Look for these signs:
- The flower or seed pod has dried and changed from green to tan, brown, or gray
- The outer covering feels papery instead of soft
- Mature seeds feel firm when pressed gently
- Seeds show their normal mature color and pattern for that variety
- The plant begins its natural late-season fade
Do not judge seed maturity by calendar dates alone. A hot, dry season may speed things up, while cool weather can slow seed development. If a cold snap threatens, move container plants into a protected space or cover them overnight with a breathable frost cloth.
Avoid heavy feeding late in seed development. At this stage, the plant is finishing its life cycle. Too much fertilizer will not make seeds mature faster, and excess moisture can encourage mold or rot.
Pro Tip: I wait until I can rub a seed head lightly between my fingers without finding soft, pale seeds. If the seeds still look green or feel squishy, I leave the plant alone for another week.
Harvest Seeds From Autoflowering Plants
Harvest on a dry day after morning dew has evaporated. Moisture creates problems during drying and storage, so avoid collecting seed heads after rain or irrigation.
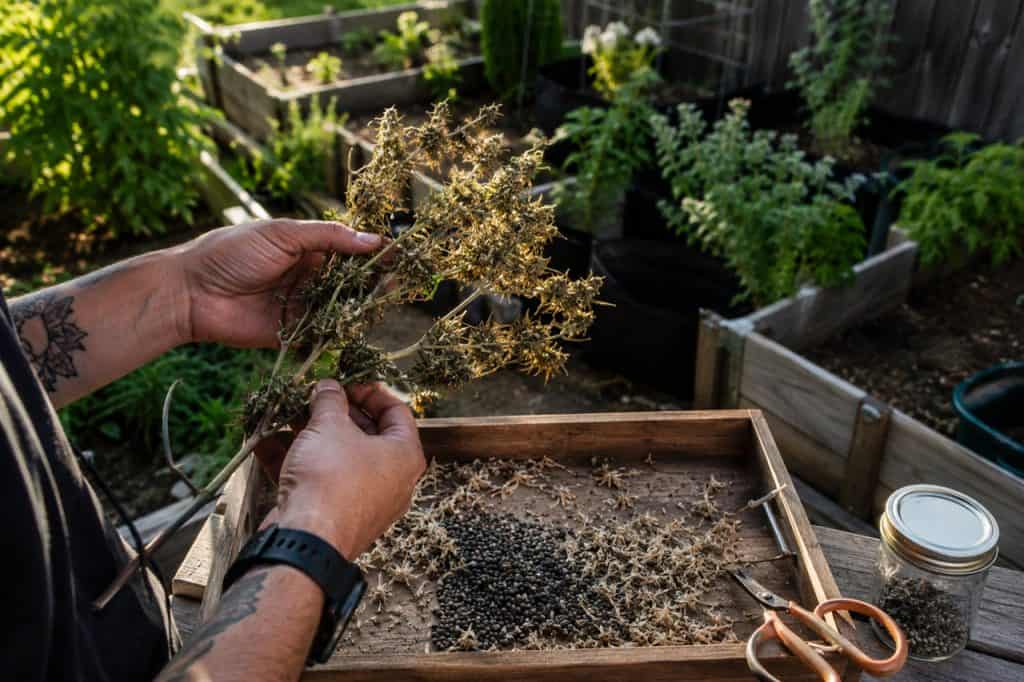
Cut the marked branch or remove the mature seed heads with clean scissors. Place them in a paper bag, shallow cardboard box, or clean tray. Do not pile damp plant material into a sealed container.
Bring the harvest indoors to a dry, shaded spot with good airflow. A spare room, covered porch, or garage works well if temperatures stay near 60 to 75 F. Keep the material away from direct sun, which can overheat delicate seed tissue.
Spread seed heads in a single layer and let them dry for seven to 14 days. Turn them gently every day or two so air reaches all sides. If your home feels humid, use a small fan nearby, but do not point it directly at loose seeds.
Once dry, break open the seed heads over a clean plate or tray. Separate seeds from stems, husks, and dried flower parts. A simple kitchen sieve can help sort out larger debris, but use a gentle touch so you do not crack the seed coat.
If you are saving seed from several plants, process one variety at a time. Keep labels with every tray and envelope. Mixing seeds may not matter for some backyard gardeners, but it makes future planting harder when you want to compare growth, flavor, or flower color.
Dry and Store Your Autoflower Seeds
Seeds last longest when they stay cool, dark, and dry. After cleaning, give them another few days of drying time before packing them away.
I usually place clean seeds on an unbleached paper towel or coffee filter for three to five days. Then I move them into labeled paper envelopes. Paper prevents trapped moisture better than plastic for short-term drying.
For longer storage, place the envelope inside an airtight glass jar with a small moisture-absorbing packet. Store the jar in a dark closet, basement shelf, or refrigerator where temperatures stay steady. A refrigerator around 35 to 40 F works well if the seeds are fully dry before storage.
Write the following on every label:
- Plant variety or identifying name
- Parent plant notes
- Pollination date
- Harvest date
- Growing location or container number
Good notes turn saved seed into a useful garden experiment. For example, you may discover that seeds from a plant grown in a sunny raised bed handle summer heat better than seeds from a plant that stayed shaded. If you want to improve your bed setup next year, review these ideas for small-space edible gardens.
Pro Tip: I never put freshly harvested seeds straight into a sealed jar. I learned the hard way that even a little hidden moisture can cause mold and ruin a whole season’s seed saving.
Test Seeds Before Planting
Before you rely on saved autoflower seeds for a new season, do a simple germination test. This tells you how many seeds still have the strength to sprout.
Place 10 seeds between two damp paper towels. Slide the towels into a loosely closed plastic bag or container, then keep them somewhere warm, around 70 to 80 F. Check daily and keep the towels damp but never dripping wet.
After several days, count how many seeds sprout. If eight out of 10 germinate, you have an 80 percent germination rate. Plant a few extra seeds if the rate is low.
Start seeds in clean containers with fresh seed-starting mix. Do not use dense outdoor soil in small pots because it can stay too wet and slow early roots. If you are deciding whether to begin with seed or nursery plants for the rest of your garden, this guide on vegetable garden seeds versus plants can help you choose.
Things to Keep in Mind
- Check local laws first: Some autoflowering plant varieties may have rules that vary by state, county, lease agreement, or neighborhood.
- Do not rush maturity: Pale, soft, or green seeds rarely store or germinate well, so give seed heads extra time to dry on the plant.
- Control pollen carefully: Pollen can travel on wind, hands, pets, clothing, and tools, so isolate plants before male flowers fully open.
- Avoid wet harvests: Collect seeds only after dew or rain has dried because moisture can cause mold during storage.
- Save seeds from strong plants: Choose plants with healthy growth, good disease resistance, and desirable traits you want to grow again.
- Keep clear labels: Seed envelopes without dates or plant notes become guesswork by the following spring.
Frequently Asked Questions
Can you get seeds from an autoflowering plant?
Yes, you can get seeds from an autoflowering plant when a receptive female flower receives compatible pollen. The seeds need several weeks to mature fully before you harvest them. Collect only firm, dry seeds for the best storage results.
How long do autoflower seeds take to mature?
Most autoflower seeds need about four to eight weeks after pollination. Warm weather and healthy plants may shorten that window slightly. Always check the actual seeds for firmness and mature color before harvesting.
Can I pollinate only one branch of an autoflowering plant?
Yes, selective pollination works well when you want a smaller seed harvest. Apply pollen to flowers on one marked branch and cover it briefly with a paper bag. This approach helps limit unwanted pollination on the rest of the plant.
What do mature autoflower seeds look like?
Mature seeds usually feel hard and look darker than immature seeds. They may appear brown, tan, gray, or patterned, depending on the variety. Soft, pale, or green seeds need more time on the plant.
How should I store autoflower seeds?
Store fully dry seeds in labeled paper envelopes inside an airtight jar. Keep the jar in a dark, dry, cool place, such as a refrigerator or stable basement shelf. Heat, humidity, and direct light reduce seed life.
Will autoflower seeds grow true to the parent plant?
Seeds may resemble their parent plants, but results vary depending on the plants used for pollination. Seed-grown plants can show differences in height, vigor, flower traits, and timing. Keep notes on parent plants so you can select the best seedlings in later seasons.
Getting seeds from autoflowering plants comes down to healthy parent plants, controlled pollination, patience during maturation, and careful drying. Give the seeds enough time to harden on the plant, then store them cool and dry with clear labels for your next growing season. I hope you found this article helpful.
You May Also Like
- How to make organic soil at home for plants
- How to start a vegetable garden in your backyard
- Best soil mix for square-foot vegetable gardening
- How to mulch your vegetable garden
- How to create a sustainable garden at home

Hello there! I’m Elsa, and gardening is my passion. As an avid gardener, I created GardeningElsa.com to share my knowledge and experience with fellow enthusiasts. My website is a comprehensive resource for gardeners of all levels, offering expert advice on a wide range of topics, including plants, flowers, herbs, and vegetable gardening. Whether you’re a beginner looking to start your first garden or a seasoned pro seeking to expand your knowledge, GardeningElsa.com has something for everyone. Read more about me.