
A sunny kitchen window and a few pots can only take you so far. In my Zone 6 backyard, I still love growing vegetables in the soil, but I set up a small indoor hydroponic garden every winter when the beds are frozen solid.
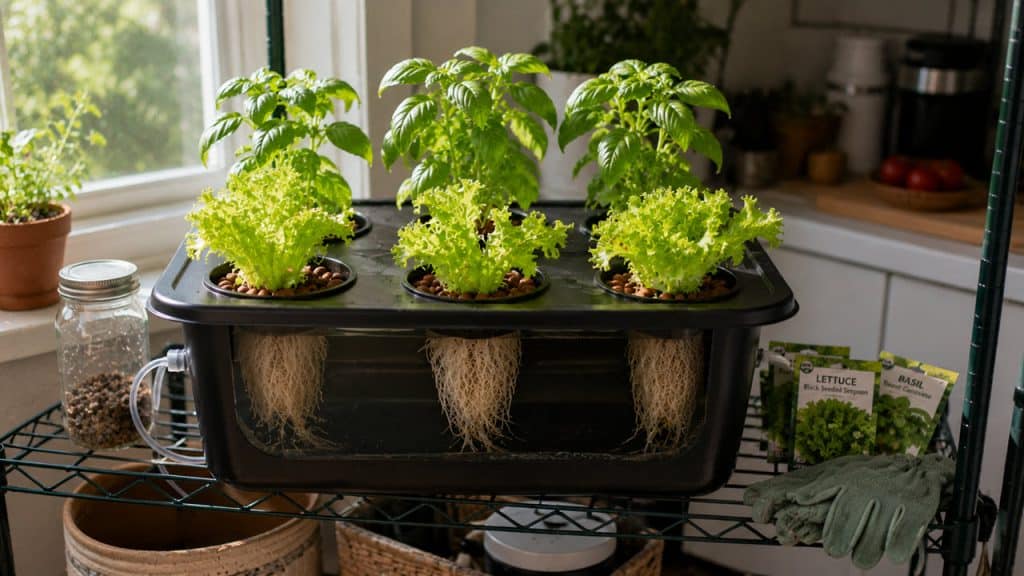
My favorite starter setup sits on a utility shelf near a bright window. It grows leaf lettuce, basil, and parsley in a simple water-and-nutrient system, without hauling bags of potting mix through the house.
Here’s how to make a small hydroponic system at home that stays manageable, produces real food, and teaches you the basics without a big investment.
What Is a Small Hydroponic System?
A hydroponic system grows plants with their roots in nutrient-rich water instead of garden soil. The water carries the minerals plants normally pull from soil, including nitrogen for leafy growth and potassium for strong roots.
For a first project, I recommend a simple Kratky hydroponic system. This non-circulating method uses a covered container, net pots, growing medium, nutrient solution, and light. You do not need pumps, tubing, or an airstone to grow quick crops successfully.
This setup works especially well in an apartment, on a covered porch, or on a kitchen counter. If you are short on outdoor growing space, these small-space edible garden ideas can help you grow more food in every available corner.
Why Start With a Small Hydroponic System?
A small hydroponic system gives you a controlled way to grow tender greens. You decide the light, water level, temperature, and nutrients instead of fighting heavy rain, poor soil, or an early frost.
In my own setup, I use one dark 5-gallon storage tote on a shelf in a spare-room window. The tote supports six small plants and takes up less room than a standard seed-starting tray. It is a practical option for gardeners in Zones 4–7 who want fresh greens during cold weather.
Start with fast, forgiving crops:
- Leaf lettuce, such as ‘Black Seeded Simpson,’ ‘Oakleaf,’ or romaine types
- Basil, especially compact Genovese basil
- Parsley, cilantro, and chives
- Bok choy and other baby Asian greens
- Arugula and mild salad mixes
Avoid tomatoes, cucumbers, squash, and full-size peppers in your first small hydroponic system. They need more root room, stronger light, and more nutrients than a simple countertop setup provides. For soil gardening later, you can explore easy vegetables for raised beds.
Supplies for a Small Hydroponic System at Home
You can build this project with a few basic pieces. Keep the system small until you learn how your plants respond.
Your Basic Materials
Gather these supplies:
- One opaque 3- to 5-gallon tote with a lid: Dark plastic blocks light, which prevents algae growth in the water.
- Four to six 2-inch net pots: These small slotted cups hold plants while letting roots reach the nutrient solution.
- Growing medium: Use clay pebbles, coco coir plugs, or rockwool starter cubes. The medium supports the seedling but does not feed it.
- Hydroponic nutrient solution: Use a fertilizer made for hydroponics, following the label’s seedling or leafy-green rate.
- pH test kit or pH meter: pH measures how acidic or alkaline water is. Most leafy greens grow best around pH 5.5 to 6.5.
- Hole saw or sharp utility knife: This makes openings in the tote lid for net pots.
- Seeds or young seedlings: Start with lettuce or basil.
- Clean water: Let chlorinated tap water sit uncovered overnight before mixing nutrients if your water has a strong chlorine smell.
- Grow light, if you lack a sunny window: Full-spectrum light supports steady growth indoors.
You can pair this project with a beginner guide to hydroponic gardening if you want a broader look at growing without soil.
Pro Tip: I always use a dark tote, even when the lid looks solid. Clear bins and pale containers let enough light into the water to grow algae, and algae quickly turns a simple system into a green, slippery mess.
How to Make a Small Hydroponic System at Home
This simple tote system takes about an hour to assemble. Choose a work surface where you can make a few plastic cuts safely and keep water nearby.
Step 1: Choose the Right Location
Pick a place with stable temperatures between 65 and 75°F. A sunny south-facing window may work during spring and summer, but most indoor winter windows do not provide enough strong light for compact, productive plants.
I place my system under a grow light in a back room, about 12 to 18 inches below the fixture. Run the light for 14 to 16 hours each day using a timer. Plants need a dark period too, so do not leave the light on around the clock.
Keep the tote away from cold glass, heating vents, and drafty exterior doors. Sudden temperature swings slow growth and can cause basil leaves to darken or curl. If you are growing herbs indoors, these tips for a thriving balcony herb garden also apply to keeping herbs compact and productive.
Step 2: Mark and Cut the Lid
Set the net pots upside down on the tote lid. Trace around each pot, spacing the holes 5 to 6 inches apart for lettuce and 8 inches apart for basil.
Cut each hole slightly smaller than the rim of the net pot. The pot should drop into the hole but rest securely on its top edge.
For a 5-gallon tote, I usually cut six holes in two rows of three. That spacing gives young lettuce enough room for airflow and prevents leaves from crowding each other too early.
Step 3: Start Seeds in a Growing Medium
Moisten your growing plugs with plain water. Place two or three seeds in each plug, then set them in a warm spot until they sprout.
For lettuce, seedlings usually emerge in 3 to 7 days at 65 to 75°F. Basil often takes 5 to 10 days and prefers slightly warmer conditions around 70 to 80°F.
After seedlings develop their first true leaves, keep the strongest seedling and snip away extras with clean scissors. True leaves are the second set of leaves that appear after the first smooth seed leaves.
You can also transplant nursery seedlings, but rinse all soil from their roots gently first. Soil in a hydroponic reservoir clouds the water and can introduce fungus or pests.
Step 4: Mix the Nutrient Solution
Fill the tote with water until the level reaches about 1 inch below the bottom of the net pots. For most 3- to 5-gallon totes, this means filling it roughly two-thirds full.
Add hydroponic nutrients at the label’s rate for young leafy plants. Stir well with a clean spoon or stick. Do not guess at the amount, because too much fertilizer can burn roots and too little will leave plants pale and weak.
Check the pH after mixing. Adjust it slowly until it falls between 5.5 and 6.5. This range helps lettuce, basil, and many herbs absorb nutrients efficiently.
If houseplants are part of your indoor growing space, learn how to choose the right liquid fertilizer for indoor plants. Soil fertilizers and hydroponic nutrients work differently, so use the right type for each growing method.
Step 5: Set the Seedlings Into Net Pots
Place each rooted plug in a net pot. Surround it with clay pebbles or another clean growing medium to keep the plant upright.
Set the net pots into the lid openings. When you begin, the bottom of each plug should lightly touch the nutrient solution. This contact encourages roots to grow downward into the water.
Once the roots extend several inches, the water level can sit 1 to 2 inches below the net pots. That small air space gives roots oxygen, which is critical in a non-circulating Kratky system.
Step 6: Give Plants Consistent Light
Light is the biggest difference between a healthy hydroponic garden and a tray of stretched, flimsy seedlings. Put your grow light 12 to 18 inches above lettuce or 8 to 12 inches above basil, depending on the fixture’s heat and strength.
Watch your plants during the first week. Long, thin stems usually mean the light sits too high or does not run long enough. Bleached patches and curled edges may mean the light sits too close.
A bright room is not always enough for food crops. For a detailed look at indoor lighting, see these grow light tips for indoor plants.
Step 7: Check Water and Roots Weekly
Lift the lid once a week and inspect the water level, roots, and container walls. Healthy roots should look white or cream-colored and smell fresh.
Add plain water as the level drops. Do not refill the tote to the top once roots hang in the air space, because they need access to oxygen as well as water.
Replace the entire nutrient solution every 2 to 3 weeks. Rinse the tote with warm water, wipe away any residue, mix a fresh batch, and return the plants. This simple habit prevents nutrient imbalance before it becomes a problem.
Pro Tip: In my first winter setup, I topped the tote off every few days because I worried the roots would dry out. The lettuce stayed small until I left a proper air gap. Roots need oxygen just as much as they need water.
Best Plants for a Small Hydroponic System
Start with crops that mature quickly and stay compact. They give you a fast win while you learn the rhythm of water, light, and nutrients.
Leaf Lettuce
Leaf lettuce is my top choice for beginners. Harvest outer leaves once plants reach 4 to 6 inches tall, usually 25 to 35 days after sprouting. Keep the center growing, and each plant can provide several harvests.
Lettuce grows best when temperatures stay below 75°F. Warm indoor rooms can make leaves bitter and trigger early flowering.
Basil
Basil loves warm water and strong light. Start pinching the top growing tip once each plant has three or four sets of true leaves. This encourages branching and gives you a bushier plant.
If your basil leaves develop unusual colors, check these guides on basil leaves turning black and basil leaves turning brown.
Parsley and Cilantro
Parsley grows slowly at first but stays productive for months. Cilantro grows quickly and prefers cooler temperatures, making it a good choice for a basement shelf or cool sunroom.
Do not pack too many herb plants into one small tote. Strong airflow between plants helps leaves dry quickly and reduces problems with mildew.
Things to Keep in Mind
- Use an opaque reservoir: Light hitting nutrient water feeds algae, which competes with plants and coats roots.
- Keep an air gap: In a Kratky system, roots need a 1- to 2-inch space between the net pot and water once they grow longer.
- Start with cool-season greens: Lettuce, arugula, and bok choy handle indoor conditions better than fruiting crops like tomatoes.
- Watch water temperature: Keep nutrient solution below 75°F when possible. Warm water holds less oxygen and encourages root problems.
- Clean between crops: Empty, rinse, and dry the tote after each planting cycle to prevent algae, mineral buildup, and disease.
- Protect kids and pets: Keep nutrient solution, small net pots, and electrical cords safely out of reach. Use a drip tray under your system if it sits indoors.
Check out Is Hydroponic Better Than Soil?
Troubleshooting a Small Hydroponic System
Yellow Leaves
Pale yellow leaves often point to weak nutrients, an incorrect pH, or low light. First, check that you mixed nutrients correctly and that the pH sits between 5.5 and 6.5.
If older leaves yellow first while new growth stays green, the plant may need a fresh nutrient solution. If all leaves look washed out and stems stretch, move the light closer.
Slimy or Brown Roots
Brown roots with a sour smell usually mean the water has become too warm or lacks oxygen. Empty the reservoir, rinse it thoroughly, mix fresh solution, and make sure you leave an air gap.
A small fan nearby can improve airflow around foliage, but do not point strong wind directly at seedlings. Keep the container shaded from hot afternoon sun.
Algae in the Water
Green water or slick growth on the tote walls means light reached the nutrient solution. Cover gaps around net pots with foil or light-blocking material, and make sure the reservoir itself is fully opaque.
Replace the solution and wash the tote before adding plants back. Algae does not always kill plants, but it creates extra work and weakens the system.
Plants Grow Tall but Stay Thin
This issue almost always comes from weak light. Lower the grow light gradually, increase the daily light period to 14 to 16 hours, and rotate the lid if one side grows toward a window.
For more help creating a compact food garden in limited space, read about growing vegetables on a balcony.
Frequently Asked Questions
Can I make a hydroponic system without a pump?
Yes. A Kratky system does not use a pump because it relies on an air gap above the water as roots grow. Start with lettuce or herbs, and avoid constantly topping off the reservoir.
What is the easiest plant to grow hydroponically at home?
Leaf lettuce is usually the easiest choice. It grows quickly, stays compact, tolerates cooler indoor temperatures, and does not need heavy feeding.
Can I use tap water in a small hydroponic system?
Most gardeners can use tap water successfully. If it smells strongly of chlorine, let it sit uncovered overnight before adding nutrients, then test and adjust the pH after mixing.
How often should I change hydroponic water?
Change the nutrient solution every 2 to 3 weeks in a small home system. Change it sooner if it turns cloudy, smells bad, develops algae, or becomes much warmer than room temperature.
Do hydroponic plants need sunlight?
They need strong light, but it can come from sunlight or a full-spectrum grow light. For reliable indoor lettuce and herbs, provide 14 to 16 hours of light daily.
Can I grow tomatoes in a small hydroponic system?
You can grow dwarf tomatoes in hydroponics, but they are not ideal for a first tote system. They need much stronger light, more root space, support, and careful nutrient management than lettuce or herbs.
A small hydroponic system at home gives you a reliable way to grow crisp lettuce and useful herbs in a compact indoor space. Start with one dark tote and a few seedlings, watch how the roots and leaves respond, and adjust light, water, and nutrients as you go. I hope you found this article helpful.
You May Also Like
- How to grow hydroponic vegetables at home
- How to create a productive window box
- How to start an herb garden
- Small-space vegetable gardening ideas
- How to grow lettuce in a square-foot garden

Hello there! I’m Elsa, and gardening is my passion. As an avid gardener, I created GardeningElsa.com to share my knowledge and experience with fellow enthusiasts. My website is a comprehensive resource for gardeners of all levels, offering expert advice on a wide range of topics, including plants, flowers, herbs, and vegetable gardening. Whether you’re a beginner looking to start your first garden or a seasoned pro seeking to expand your knowledge, GardeningElsa.com has something for everyone. Read more about me.