
A backyard vegetable bed teaches you patience fast. One week your peppers look perfect, and the next week a heat wave dries the soil faster than expected. Hydroponics removes the soil from the equation, but it replaces it with water, nutrients, light, and a few details that need steady attention.
If growing cannabis is legal for you and you meet all local requirements, a small hydroponic setup can give you close control over the root zone. You will learn how to grow hydroponic weed for beginners with a simple system, sensible daily checks, and fewer avoidable mistakes.
Start With Legal, Safe Planning
Before you buy seeds, plants, or equipment, confirm that home cultivation is allowed where you live. Cannabis rules vary by state, county, city, housing agreement, and whether you grow for adult-use or medical purposes. Keep plants locked away from children, pets, and anyone not legally allowed to access them.
I would treat a hydroponic grow area like a utility room, not like a houseplant shelf. Water, electricity, bright lights, and warm humid air all share the same small space. That means you need a dry electrical setup, a stable floor, and enough air movement to avoid mold.
Use a dedicated indoor area with a nearby outlet, a level surface, and a way to manage runoff. A spare closet, basement corner, or insulated garage can work well if you can keep temperatures steady. Avoid a damp unfinished basement unless you can manage humidity.
For a first run, I recommend starting with one or two plants. A smaller garden gives you room to learn how roots, water, and nutrients respond before you scale up.
Pro Tip: I’ve found that beginners get better results from a tidy two-plant setup than from a crowded grow room. Fewer plants mean fewer reservoirs to clean, fewer leaves to inspect, and fewer problems to solve at once.
Choose a Simple Hydroponic System
When learning how to grow hydroponic weed for beginners, skip complicated recirculating systems. A deep water culture system, often called DWC, offers the most straightforward starting point.
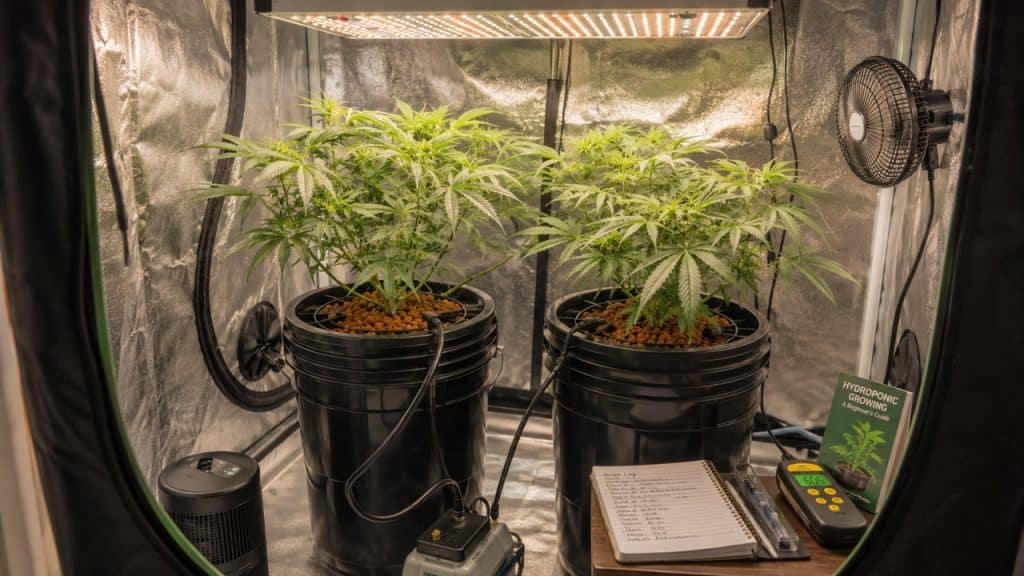
In DWC, the plant sits in a net pot above a bucket or reservoir of nutrient water. An air pump sends bubbles through an air stone at the bottom. Those bubbles keep the water oxygen-rich, so roots can breathe while they absorb water and fertilizer.
A basic first setup needs:
- A food-safe, light-blocking 5-gallon bucket with a lid
- A 6-inch net pot, which is a perforated container that holds the plant
- Clay pebbles or another inert growing medium to support the plant
- An air pump, airline tubing, and air stone
- A full-spectrum LED grow light
- A small fan for gentle air circulation
- A thermometer and humidity meter
- A pH meter and an EC or TDS meter
- Hydroponic nutrients made for the plant’s growth stage
Light-blocking containers matter. Sunlight or grow-light spill reaching the nutrient water encourages algae, which competes with roots and makes cleanup harder. Use black buckets or place opaque covers around every reservoir.
If your growing space is limited, review these ideas for a small-space edible garden. The same planning principle applies indoors: give each plant enough room to breathe, reach it easily, and grow without crowding.
Check out Grow Hydroponic Vegetables at Home
Why DWC Works for Beginners
DWC teaches the core hydroponic skills without a maze of tubing, timers, and pumps. You can lift the lid, look at the roots, check water level, and spot trouble early.
Healthy roots look bright white or cream-colored and feel firm. Brown, slimy, or sour-smelling roots signal trouble. In my experience, catching that change early saves far more plants than trying to fix a neglected reservoir later.
A DWC bucket also makes water changes simple. You empty the bucket, rinse it, refill it, add nutrients, check the readings, and return the plant. That routine becomes familiar after two or three weeks.
Set Up Your Grow Space
Plan a clean space around 2 feet by 4 feet for one or two small DWC buckets. Leave enough room to lift each lid without bumping branches or spilling nutrient water. Put a waterproof tray beneath the buckets to catch drips.
Hang your LED grow light securely above the plants. Start with the light about 24 to 30 inches above seedlings, then follow the light maker’s guidance as plants grow. Keep the fixture high enough to prevent leaf bleaching or heat stress, but close enough to prevent stretching.
For early growth, provide 18 hours of light and 6 hours of darkness each day. Use a timer instead of relying on memory. Plants respond better to a stable schedule than to lights that turn on and off at different times.
Keep daytime temperatures near 70 to 80 F. Aim for 65 to 72 F at night. Warm water holds less dissolved oxygen, so try to keep the nutrient solution between 65 and 70 F whenever possible.
A small fan should move leaves lightly, not bend stems hard. Gentle airflow strengthens stems, evens out temperature pockets, and discourages damp, stagnant conditions around dense foliage.
Indoor growing has the same basic lighting challenge as houseplant care. The difference is intensity and consistency. If you need help understanding light placement, these tips on choosing grow lights for indoor plants will help you avoid a weak, stretched canopy.
Pro Tip: I always set up the empty system first and let it run for 24 hours. It gives me time to find light leaks, noisy air pumps, warm water, and awkward cords before a living plant depends on the setup.
Prepare Water and Nutrients
Hydroponic plants receive all their nutrition through water. In soil, roots can explore for nutrients and moisture. In hydroponics, you create the root environment, so water quality and nutrient strength matter every day.
Fill your reservoir with clean water. If your tap water has a heavy chlorine smell, let it sit uncovered for a day before use. If it has very high mineral content, the starting reading on your EC or TDS meter may already be high, which limits how much nutrient you can add.
pH measures how acidic or alkaline your water is. Cannabis in hydroponics usually takes up nutrients best when pH stays between 5.5 and 6.5. I aim for 5.8 to 6.1 because it leaves room for small natural changes.
EC, or electrical conductivity, measures the total dissolved salts in the solution. A TDS meter reports a related estimate. These numbers help you avoid feeding too weakly or too strongly.
Begin seedlings and young plants with a mild nutrient solution. Follow the nutrient label’s lowest recommended rate, then watch the plant for several days. Strong nutrients can burn tender roots, turning leaf tips yellow or brown.
Add nutrients to water one product at a time. Stir thoroughly after each addition. Check EC or TDS after mixing, then adjust pH last. Never mix concentrated nutrient bottles directly together because they can form unusable solids.
If you already care for houseplants, the principle may sound familiar. But hydroponics gives you less margin for error than soil. This guide to liquid fertilizer for indoor plants offers useful background on why diluted feeding beats overfeeding.
Check the Reservoir Daily
Every day, look at the water level, temperature, pH, and overall plant condition. Top off the reservoir with plain pH-adjusted water when the level drops. Do not add a full nutrient dose with every top-off unless your readings show the solution has weakened.
Once a week, replace the entire nutrient solution. Clean the bucket, lid, air stone, and net pot gently before refilling. This removes salt buildup and keeps the root zone fresh.
Watch how EC changes over time:
- If water drops and EC rises, the plant drinks more water than nutrients; top off with plain water.
- If water drops and EC falls, the plant uses nutrients quickly; increase strength slightly at the next change.
- If water and EC barely change, check root health, water temperature, and light intensity.
Start Plants and Build Roots
Use genetics and planting material from a legal, reputable local source. Choose healthy young plants or seeds intended for your legal growing situation. For a beginner, starting with a vigorous young plant often shortens the learning curve because you skip the delicate seedling stage.
If you start from seed, germinate it in a moist starter plug. Once roots show, place the plug inside the net pot and surround it with rinsed clay pebbles. Keep the plug moist, but do not soak the young stem.
In DWC, the water level should sit just below the net pot at first. The bubbles will splash moisture upward while roots grow down. Once roots reach the water, lower the level by about 1 inch to create an air gap. That gap encourages roots to take in oxygen.
During the vegetative stage, plants build leaves, stems, and roots. Give them stable light, moderate nutrients, and enough space between branches for airflow. Avoid aggressive pruning on a young plant. Remove only damaged leaves or weak growth that sits against the reservoir lid.
A plant that stretches tall with wide gaps between leaves needs more usable light. A plant with curled, dry leaf edges may sit too close to the light or deal with excessive heat. Make one change at a time and wait a few days before making another.
Pro Tip: I’ve found that root health tells the real story before leaves do. When I check a bucket, I lift the lid and inspect the roots first; clean, pale roots usually mean the plant has a strong foundation.
Manage Flowering and Humidity
When the plant reaches the size that fits your space, many cannabis varieties begin flowering after you change the light cycle to 12 hours of light and 12 hours of uninterrupted darkness. Use a reliable timer, and do not interrupt the dark period with room lights or frequent checks.
Flowering plants need a stable environment more than constant tinkering. Keep daytime temperatures around 68 to 78 F. Lower relative humidity as flowers become dense, aiming near 40 to 50 percent during late flowering.
High humidity around crowded flowers creates ideal conditions for mold. Check plants daily, especially in humid summers or cool basements. Look deep inside the canopy, not only at the top leaves.
Use a fan to move air across and under the canopy. Do not point a strong fan directly at one flower cluster all day. You want steady circulation, not wind damage.
Keep nutrient water clean and cool through flowering. If the reservoir smells sour, looks cloudy, or develops slime, act immediately. Replace the solution, clean the bucket and air stone, and correct the cause before root problems spread.
Hydroponic cannabis does not use garden soil, compost, or companion planting inside the reservoir. However, the discipline behind an organic garden at home still helps: start clean, inspect plants often, and prevent problems before they gain momentum.
Spot Problems Early
A hydroponic garden responds quickly, for better or worse. Learn to read the first signs instead of waiting for a plant to look severely damaged.
Yellow or Burned Leaf Tips
Brown tips often indicate excessive nutrient strength. Check EC or TDS, then replace the reservoir with a milder solution if the reading is excessive. Do not keep adding more products to “balance” a stressed reservoir.
Yellow lower leaves can also signal a feeding issue, but first check pH. Nutrients may be present but unavailable if pH drifts too far from the proper range.
Drooping Leaves
Drooping leaves can come from overly warm water, low oxygen, light stress, or root trouble. Check the water temperature and make sure the air stone is bubbling vigorously. Then inspect roots for discoloration or slime.
A plant that droops only shortly before lights go off may simply follow a natural daily rhythm. A plant that stays limp all day needs attention.
Algae and Root Slime
Green algae means light has reached nutrient water. Cover the reservoir, seal holes around tubing, and replace the water. Brown slime and bad odors often point to low oxygen or high water temperature.
Clean every piece that touches the solution. Do not reuse dirty nutrient water. Prevention is easier than trying to rescue a badly damaged root system.
Pests Indoors
Indoor pests often arrive on new plants, clothing, or open windows. Check leaf undersides twice a week for tiny insects, webbing, pale stippling, or sticky residue. Isolate any new plant before placing it near your main grow.
For general houseplant guidance, learn how to get rid of spider mites on indoor plants. Early inspection matters because pests multiply quickly under warm grow lights.
Pro Tip: In my experience, the best troubleshooting tool is a simple notebook. I write down water temperature, pH, EC, top-offs, and changes I make, so I do not guess about what caused a problem.
Things to Keep in Mind
- Know your local rules: Check state and local laws, lease terms, and household plant limits before you begin, because legal home-growing rules differ widely.
- Keep electricity dry: Mount power strips off the floor, use drip loops in every cord, and never place plugs or timers under a reservoir.
- Protect the dark period: During flowering, keep the 12-hour dark period truly dark; repeated light interruptions can stress plants.
- Change water weekly: Fresh nutrient solution helps prevent salt buildup, unstable pH, and root-zone problems.
- Control heat and humidity: Warm nutrient water and high humidity can trigger root issues and mold, especially as plants become fuller.
- Keep plants secure: Lock the grow area and prevent access by children, pets, and visitors who should not handle the plants.
Frequently Asked Questions
Is hydroponic weed hard to grow for beginners?
Hydroponic weed is not difficult if you start with one simple DWC bucket and check it daily. The learning curve comes from managing pH, nutrient strength, water temperature, and cleanliness. Soil forgives missed checks more easily, but hydroponics gives you faster feedback.
What is the easiest hydroponic system for weed?
A deep water culture bucket is usually the easiest beginner system. It uses a bucket, net pot, air stone, and nutrient water, with no complicated irrigation lines. You can inspect roots and change water without dismantling the entire setup.
How often should I change hydroponic water?
Change the nutrient solution about once a week for a small beginner system. Top off between changes with plain pH-adjusted water as the plant drinks. Replace water sooner if it turns cloudy, smells bad, gets too warm, or develops algae.
What pH should hydroponic weed have?
Keep the nutrient solution between pH 5.5 and 6.5. Many home growers aim around 5.8 to 6.1 because that range supports steady nutrient uptake. Check pH daily because it can drift as roots absorb nutrients.
Do hydroponic weed plants need an air pump?
Yes, a DWC setup needs an air pump and air stone. Roots need oxygen as much as they need water and nutrients. Without bubbling water, roots can suffocate, weaken, and develop rot.
Can I grow hydroponic weed in a garage?
A garage can work if you can control temperature, humidity, light leaks, and access. Insulate the space from extreme summer heat and winter cold, especially in Zones 4–7. Keep the setup clean, secure, and away from vehicles, fuel, and chemical fumes.
A clean DWC bucket, steady light schedule, cool oxygen-rich water, and daily checks make hydroponic growing much easier to manage. Start small, keep a written record, and correct small changes early instead of reacting to major problems. I hope you found this article helpful.
You May Also Like
- How to start hydroponic gardening
- Best indoor plants that like direct sunlight
- How to get rid of bugs on indoor plants
- How to prevent indoor plants from leaking water
- Best self-watering pots for busy urban gardeners

Hello there! I’m Elsa, and gardening is my passion. As an avid gardener, I created GardeningElsa.com to share my knowledge and experience with fellow enthusiasts. My website is a comprehensive resource for gardeners of all levels, offering expert advice on a wide range of topics, including plants, flowers, herbs, and vegetable gardening. Whether you’re a beginner looking to start your first garden or a seasoned pro seeking to expand your knowledge, GardeningElsa.com has something for everyone. Read more about me.
